


Here are brief summaries of just some of these:
 Here's the main window from our Payroll application
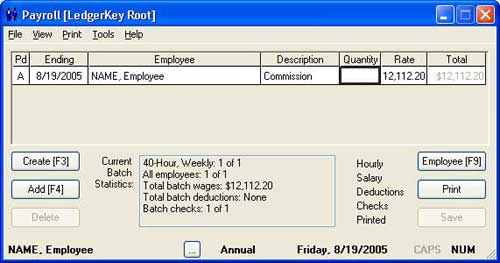
Note the familiar Windows menu bar at the top with File>Open and all the usual options.
The grid below that lists all the hours and earnings for this batch. You can just scroll through them.
At the center bottom of the window is a summary of the batch. The column to the right of the box, headed by "Hourly", "Salary", and so on, is a checklist. As you perform each step in the batch, Payroll checks off that item.
Surrounding that are buttons so you can do most of the batch work without ever leaving that window. You can drag it larger if you like.
Many of the menu options and buttons have "hot keys" so you can select them without leaving the keyboard. (For example, pressing F9 from the window above opens an Employee window for you to review all that information.)
 Almost all the applications we provide store, retrieve, and process data. To
facilitate the first two, we've invented open dialogs -- portals -- through which you can view and select records, such as
customers, employees, ledger accounts, and so on.
Almost all the applications we provide store, retrieve, and process data. To
facilitate the first two, we've invented open dialogs -- portals -- through which you can view and select records, such as
customers, employees, ledger accounts, and so on.
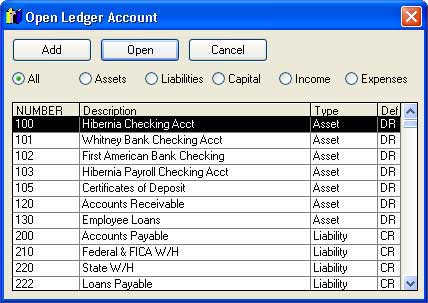
Here's the Open Ledger Account dialog from any of our applications referencing
ledger accounts:
Note that the highlight is on account number "100", the last record you worked with.
Pressing a key (such as 2) moves the highlight to the first record starting with that character (such as "2" and account number "200"). Pressing a second key (such as 1) will move to the record matching the pair (such as account number "210").
Pressing Up or Down, PgUp or PgDn scrolls through the records. Click on a column head of the grid to sort or sequence the records in that order.
Press Enter with the highlight on the record (or double-click it or click Open with your mouse) to select it. So, in this case, when the window opens, you key 2, and 1, and the highlight moves to account number "210", and you press Enter to select it. Three key strokes to call up a record! And you're viewing sections of the database as you make your selection (to be sure you have the correct record). You can enlarge the window to the size of your monitor to see more.
In some instances, such as printing reports, there will be a column at the far left so you can select, say, a group of just three or four customers or employees or vendors. (This is similar to what you can do in Windows Explorer or "My Computer".)
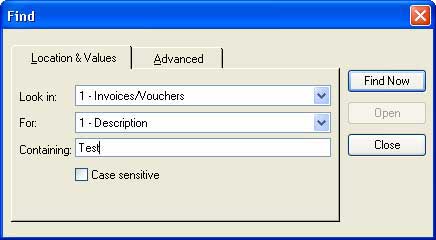
Select Tools>Find (or press Ctrl+F from an open dialog, and a
window like this will open:
This is the Find window from our Accounts Payable application. Here, you can "find" any payable invoice with, say, the word "Test" in its description.
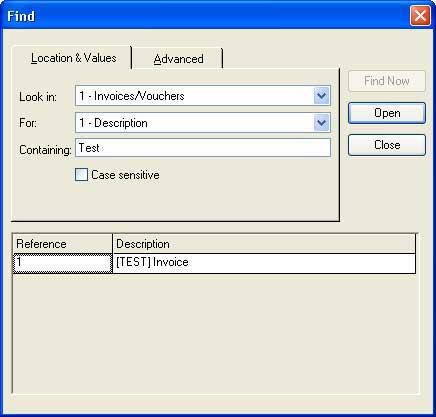 When you click Find Now or press Enter, the application will
search the database and expand the window like this:
When you click Find Now or press Enter, the application will
search the database and expand the window like this:
If there were more than one match, you could scroll through them. Pressing Enter or clicking Open will select it. Or you can change the entry in the box next to "Containing:", and find other records.
This is another portal through which you can easily review database records and select for editing.
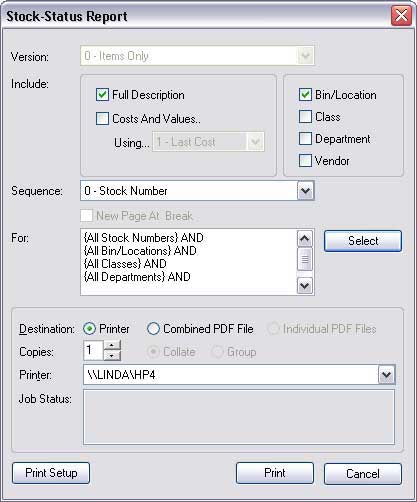 When you select a report, you will see a window much like this one from the Stock Status Report option of our Inventory
application.
When you select a report, you will see a window much like this one from the Stock Status Report option of our Inventory
application.
Notice how there are five sections to this window. Each one describes a different criterion related to what information will be included and how it will be printed.
There are virtually an infinite number of possibilities from just these simple options. In the most common instances (such as an Edit List of data you just entered), you just click Print, because the settings will already be what you want. In other cases, you may select a range of dates. Or, you may want something very specific, such as sales history for a single inventory item at a certain customer. All these are possible.
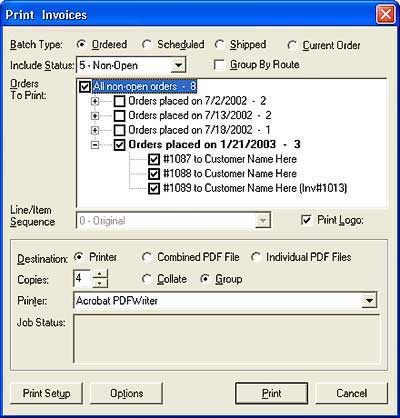
 Often, you can select items from
the database by choosing a range of criteria, and the application will display a treed list of records, with checkboxes, that meet
the criteria, and you just select or deselect the ones you want or don't.
Often, you can select items from
the database by choosing a range of criteria, and the application will display a treed list of records, with checkboxes, that meet
the criteria, and you just select or deselect the ones you want or don't.
For example, enter a range of shipped dates and the application will show you available orders from within that range, grouped by shipped date.
Double-click the group line to expand and display all the orders for that date. Click the check box to select the orders for that date; or, check off the individual orders. Or, remove the check to de-select an order. Or, orders for a date. What could be simpler?
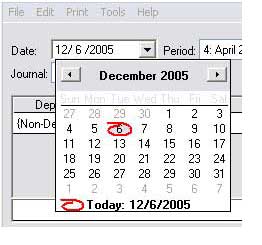 At the right is an example of the
date-entry control from our General Ledger module.
At the right is an example of the
date-entry control from our General Ledger module.
To enter the journal-entry date, you can key the month, day, or year, pressing right or left to move back and forth and press Tab when you're done.
Or, you can open a drop-down calendar and use your mouse to select the date you want.
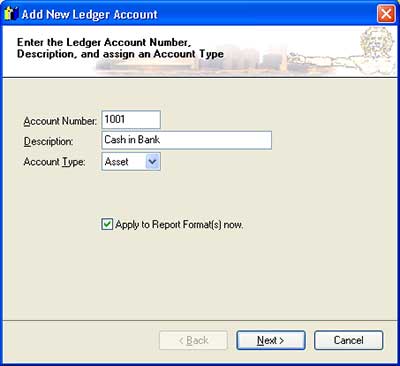 When you're adding "master" records to the database, they often
reference or are tied to several other parts of the database. To streamline this, we have incorporated Microsoft's familiar "wizard"
look-and-feel. Here's an example.
When you're adding "master" records to the database, they often
reference or are tied to several other parts of the database. To streamline this, we have incorporated Microsoft's familiar "wizard"
look-and-feel. Here's an example.
These are routines with sequences of windows that guide you through assigning the necessary values, including verification that they fit normal ranges. Usually you can check off which information you want to enter when adding a record, and the application will "remember" next time, further streamlining the process without giving up any control.
 Click here for more
details on one of our wizards.
Click here for more
details on one of our wizards.
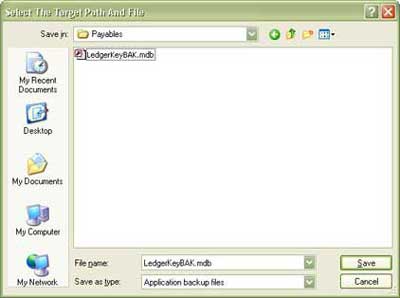 This is the common dialog used by virtually
all Windows applications to select a path and file name.
This is the common dialog used by virtually
all Windows applications to select a path and file name.
This version is the one that appears in all our backup routines.
Click here for information on the database
capacities of our applications.
All our applications are fully compatible with Windows 98 Second Edition (Win98SE) through Windows XP (WinXP). (We recommend Windows XP Professional.) We have optimized our latest Version-6 applications for WinXP, though they are backwardly compatible with Win98SE. (We have generated screen shots throughout our web site with Win98SE and WinXP and various configurations of both.)
Click here for more on networking and our applications
and us.
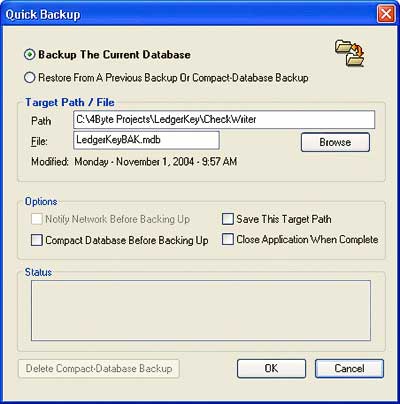
Just click OK and the application will copy the entire database in a few seconds! It's so easy, you can do this just before processing or other routines that change large ranges of data. Then, if something goes wrong, you can quickly "turn back the clock" to exactly as it was before processing.
A couple of notes about backing up: Though the quick backup only takes a few seconds, no other network stations can be using the database.
This "quick" backup copies the database to either another file locally or to another hard drive, so it is not a replacement for backing up to a removable drive that you can take off-site. We have our own utility for streamlining that.
Click here for more on backing up.
Here's an example: When you launch our Orders application, you will see two windows, one for the order-wide information (dates, addresses, and so on) and another with the lines items, quantities, and prices in a grid. Press F7 and a window opens with all the inventory information. Click Allocated in that window and another opens with other orders having the same item. Press Enter or double-click on one of them, and it becomes the current order. Press F8 from either Orders window and a customer window opens. Click Summary and you can see the customer's current balances and sales-history summary.
As you become familiar with these, virtually everything you need is just one or two mouse clicks away. (Or you can get the same results with menus and key strokes without having to leave the keyboard.)
 |
 |
We can also connect to your systems directly from our office! If you're having a problem, we can observe it and -- usually -- diagnose it on the spot. We can make database changes and install application updates "on the fly".